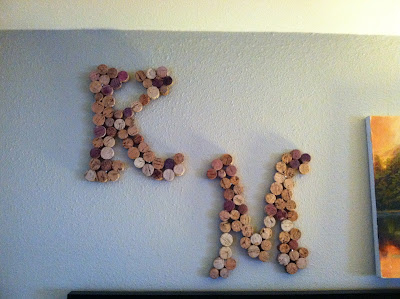
corks, wall decor, home decor, DIY, cork letters, cork decor, crafts
Since the next projects on my list aren't going to be happening for another few weeks I'm going back to past projects I've done. Inspiration came from a few different sources, one being Pinterest and the other being the fabulous Sherry and John at younghouselove.com, if you haven't checked them out do it now. I not so secretly want to be their new best friend (did I just say that out loud?!) and semi-stalk them but I don't feel too weird considering they're one of the most followed DIY/life blogs out there. Did I mention they're fabulous? Moving on. So they have this picture frame collage type format in a hallway in their house:
 |
| http://www.younghouselove.com/photo-gallery-2/our-current-house/ |
 |
| http://www.younghouselove.com/photo-gallery-2/our-current-house/ |
(If I'm not giving enough credit
that I took it off their site my apologies, but I took them directly off their
site. Again check them out, fabulous.)
Which I thought would look nice on
the entryway wall over our entryway table (so lovingly and wonderfully made as
a house warming gift by our good friend Andrew. Now I had a hard time starting
this process, I was insecure about what to put where and how I wanted it to
flow. Well as luck would have it there was a hook installed by the previous
owners that was painted over (and apparently super glued) that would not come
out of the wall. So voila, my starting point. I hung a beautiful hand made art
piece of skeleton keys my friend Jillian made me for Christmas on it and went
from there.
 |
| Has since changed, gives an idea though. |
As mentioned before my other
inspiration was from Pinterest - read: internet crack. complete addiction-. I
thought two smaller versions of K and M would look nice on the picture collage
wall.
It just so happened around this time
Jililan had come across a large amount of corks for a project she wanted to do
and nicely gave me a bag of them. I started out with smaller wood letters from
JoAnn's thinking I was going to follow the same template as the inspiration
picture. My initial idea was to glue the corks to the wood letters a la
inspiration picture but as I started laying out the full height/size corks I
didn't like how they looked, the corks weren't fitting tightly together and
just wasn't turning out. So I cut a few corks into discs with a paring knife I
didn't care about. They are in no way uniformly cut but it worked, I know you
can cut them with a band saw if you're lucky enough to have one. They still
didn't look right with so much black showing through the spaces.
After sending to a few friends for
opinions I decided to just use the wood letters as templates and glue the corks
discs to each other to form the letters. (Unfortunately I don't have any
pictures of this process). So I turned the letters over so that the sides
of the cork discs I wanted to be showing would be flush with each other and the
glue would be on the backs of the corks. I started out using Loctite super glue
which unfortunately only lasted 3-4 edges or so. From there I tried Gorilla
super glue (would NOT recommend...I have yet to see what it actually holds
together) and Gorilla wood glue which worked fine.
This process took a few snow days
because the glue took a while to set. How I did it was I put glue on the edge
of the cork that was going to be up against another cork edge. Once all the
edges were glued together I basically did a run of glue along each connection
attempting to connect the entire letter. There were a few places where glue had
seeped into a puddle or corner where it showed on the face of the cork discs, I
just used a box cutter to snap out the dried glue.
After drying this was the final product:
After drying this was the final product:
It is
rather fragile but once it's nailed up on the wall it doesn't really matter. Not
too shabby!


No comments:
Post a Comment